Thanks, Klauss!

Yep, both Brad and Howard had nice things to say at wcplanet, yesterday.
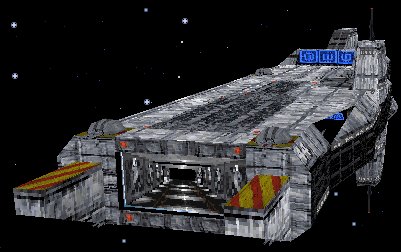
I think I've proven another point, if I may say so. 512 is pretty damn enough resolution for a small ship. I didn't even use dual UV's and mirroring, here.
One argument I put to Brad at wcplanet that I never got around to post here is that if we avoid the mindset of looking at a ship in isolation, and adopt instead a mindset of thinking how a ship looks within the artistic ecology of a whole game environment, 512 looks
better than 1024 on a small ship; because 1024 would make it look discordant, next to a larger ship or station. One needs to have some kind of overall game-plan, not just strive for the best looks possible for each individual unit.
And I believe also that part of a good WOW factor is for the amount of information in a texture to far exceed its representation capacity: The fact that the working textures and xcf's are 2048 kind of overwhelms the 512 reductions. I'm sure very few texels side by side have the exact same value. And our brains are used to seeing this, subliminally, in photography. It suggests to us that there's more there than meets the eye, which is true; though it's limited; but we don't know where the limit is so we assume none. If I were to leave the textures at 2048, the extra detail would be there for our eyes to see, but it would give away the limited extent of information present. Call it a "religious" belief, if you will; but I do strongly feel it's true.
I hope I haven't missed anything in that zip file; it's 100 megs, and compression doesn't do much for it, but my whole working folder is over 800 megs...
By the way, part of the reason it took so long is the nesting of the xcf's.
And since you may need to work with them to make color, specularity and shininess adjustments, I should tell you how this nesting works.
One thing that Gimp's xcf's lack (afaik) is a way to represent filtering operations, so they need to be done manually and documented separately.
So, let me describe it via an example:
Suppose you were adding a greeble somewhere. Let's assume it's a square of paint framed by a groove in the bump map. The steps to follow. to obtain a set of final textures, would be:
1) Draw the groove: Open great_bump3.xcf, there's a layer called grooves. Use the brush tool, fuzzy circle #9 for consistency with the other grooves, and draw the rectangle. There's also a layer called "paint" in there, that's NOT used by the xcf (always turned off) but is there for convenience of generating the paint layer for the paint xcf. So you would switch to the paint layer and paint your rectangle there. Now you can export that layer to a temporary PNG, then turn it back off, invisible; making all the other layers visible. Except the bottom layers, that is; I usually have one or two layers at the bottom of the xcf stacks that are there for tracing reference convenience only. I usually click the chain icon on them, which I'm not sure what it does, but helps me remember which layers should NOT be on when exporting. So, now, export the bump map by going to File -> Save a copy; --I give it the same name as the xcf, but change the extension to .png.
2) Open the new .png (first item in File -> Open Recent), and produce an updated bumpmap ambient occlusion, by going to Filters -> Line Detect -> Difference of Gaussians; with radiuses 5 and 2. File -> Save Copy, and give it a name of your choice .png. Don't close the window yet; instead, Ctrl-Z to get back to the bumpmap.
3) Make a normal map: Filters -> Map -> Normal, then Dewitt 5x5 I think gets the best results. File -> Save a Copy; name of choice. Close window without saving.
4a) Updating the paint mask. Open the paint.xcf and temporarily slap on the paint layer you exported from great_bump3.xcf. Transfer the new info to the paint layer of the paint.xcf, but adjusting colors as necessary. The paint layer of the bumpmap doesn't have color authority; it's just for boundary information and tracing convenience. Delete the temporary layer when done. Save a copy .png. Open the new png, select background by color, make black; invert selection, make white. Color threshold for selection has to be very precise not to grab things it shouldn't or break up the lines, yet not to fatten the lines too much. The magic number is 26. Save copy that as paint_mask.png for later use. Ctrl-Z back; don't close yet. Get back to where the background is selected.
4b) Updating paint: With the background selected, go to color curves, but switch from Value to Alpha curve, grab the upper right corner of the line and bring it down to zero. If there is no alpha curve, go first to Layer -> Transparency -> Add Alpha Channel. Save copy as paint_diffuse.png. Don't close yet. Open paint_specular.png as reference and manually change colors to match paint_specular.png, using select regions by color, and the paint bucket tool. Sorry; I don't know of any other way to do this. Save copy over the old paint_specular.png. Close without saving.
5) Update ambient occlusion: Open finemesh_ao_bumped.xcf. There's only two layers to it: finemesh_ao_padd, which is the manually fixed and background padded ambient occlusion output from Blender; and the bumpmap ambient occlusion layer. So just turn off visibility for the second, but highlight it in the layers dialog. Then go to File -> Open as Layer and give it the name of the bumpmap difference of gaussians we saved. Make sure the blending type and ratio are the same. Then delete the old layer. Save, then Save Copy as ambient_occlusion.png.
6) Generate diffuse and specular multiplier masks: File -> Open Recent... first item. (Open also the existing ambient_occlusion_diff_mult.png, for visual reference.) Go to Tools -> Color -> Curves. Make a square root curve with the value line; horizontal parabola. Should brighten the picture a lot. Now go to the red and blue component curves and tweak the lines a little bit. I do this to decouple quantization between color components. I just put a point at a quarter of the way, and another at 3/4 of the way; make the darker part of the red line a tiny bit darker, and the brighter part a tiny bit brighter. Same tweak in blue, but reversed. Make sure it looks similar to the old ambient_occlusion_diff_mult.png, and then save copy over it. Don't close the window. Just Ctrl-Z back. Do another color curves but this time a square function, upright parabola, and similar tweaks for red and blue but reversed. Try and get a match to the existing ambient_occlusion_spec_mult.png, and save a copy over it. Close without saving.
7) Diffuse: Open diffuse.xcf and update the ambient_occlusion_diff_mult.png and paint_diffuse.png layers, making sure you have same locations in the layer stack, same blending mode, and same blend ratio. There may be a grooves layer there too, can't remember, which may need updating too, by opening great_bump3.xcf, singling out the grooves, and saving copy. Yes, I seem to remember that was the case, and unfortunately there's one other step, changing the color of them to make the grooves a little brownish.
Then delete the old layers. When done with diffuse.xcf, save it, then save copy as diffuse.png. Close.
8 ) Lightmap: Open lightmap.xcf and update the ambient_occlusion.png and diffuse.png layers. Save, then Save Copy as lightmap.png.
9) Specular: Same thing, open specular.xcf, update the ambient_occlusion_spec_mult.png and paint_specular.png layers, save, save copy as specular.png.
10) Shininess: Just transfer the new square to it and color to taste. Save and save copy as shininess.png.
11) Normal map: Open the normal map we made from the bump map, then open as layer the paint mask. Select by color the background of the paint mask, turn visibility of the paint mask off; click on the normal map layer to make it the working layer, Filters -> Noise -> Scatter RGB, 3 for all components, uncorrelated, independent. Will add a bit of noise to the bumpmap, except the painted areas. Delete the paint mask layer. Select All. Filters -> Map -> Normal Map, but change function to Normalize Only.
Save copy some new name.png.
Open great_norm.xcf and update the bumpmap normals layer with the png above, same blend mode and ratio. Save. Save copy as great_norm.png. Close.
Now File -> Open Recent, first item, and again Filters -> Map -> Normalmap, with Normalize Only. Save.
12) Grab each of diffuse.png, specular.png, lightmap.png and shininess.png, and for each of them, Image -> Scale Image 512; then Filter -> Enhance -> Sharpen 33.
Done.


